
Marketing Activation
Turn your top segments into live audiences across every channel.
By the end of this guide, you will have identified the PersonaLive segments that define your best customers, built a targeted audience in Activate, exported it to one active marketing channel, and personalized creative and copy for that audience.
Audience targeting gets the right people into the campaign. Customizing creative and copy for each audience is what drives the best performance—the same ad rarely resonates equally across different PersonaLive groups. Plan to invest in segment-specific imagery, tone, and messaging alongside your Activate exports.
This workflow uses Append, Analyze, Explore, Activate, and Segments.
Marketing activation workflow
Build your segment profile — Everyone starts here. Choose the best method available to identify the groups and segments that define your ideal customer.
Build your audience in Activate — Select your groups or segments, apply any geographic or demographic filters, and preview the audience before exporting.
Export to your channels — Choose from Meta, CTV, programmatic, social, email, direct mail, or zip codes and radii.
Personalize creative by segment — Customize imagery, tone, and copy for each audience using segment profiles and Campaign Brief. This step is as important as the export itself.
Advanced tips — Run localized campaigns and apply the Nudge Method for Meta.
Export types at a glance
You don't have to pick just one channel. Many brands activate the same audience across multiple destinations at once.
| Export type | What gets exported | Supported channels |
|---|---|---|
| Account ID | PersonaLive pushes the audience directly to your ad account. | Meta (Facebook/Instagram) |
| Programmatic marketplace | Audience is available in the DSP's data marketplace. | The Trade Desk, Google DV360 |
| Programmatic seat | Audience is sent to your account. | Simpli.fi |
| Hashed customer list | File of hashed emails to upload. | X, TikTok, Snapchat, LinkedIn, Pinterest, Amazon |
| Email list | File of email addresses for campaign expansion. | Email platform vendors |
| Direct mail list | Mailing addresses for offline campaign delivery. | Direct mail vendors |
| Zip code / radii list | Geographic targeting list. | Google Ads |
Build your segment profile
Before you can activate audiences, you need to know which PersonaLive groups and segments define your best customers. Use the highest-quality method available to you.
Tip
If you are a new or emerging brand lacking significant store or customer data, choose a competitor or analogous brand as your proxy when reviewing Credit Card Spend data or when Options 3 or 4 ask you to load locations.
| # | Method | Best for | Requires |
|---|---|---|---|
| 1 | Customer Data Upload | Brands with transaction or loyalty records. Captures your actual buyers directly. | Your own customer file (addresses, emails, or coordinates). |
| 2 | Credit Card Spend | Any brand with transaction volume in the CC dataset. Captures actual buyers—highest signal quality. | Strategist subscription. Larger, established brands only. |
| 3 | Mobile Data | Any brand with existing locations. Captures actual store visitors. | Locations loaded in the platform. Mobile data availability varies. |
| 4 | Radius Rings | Any brand. Captures residential population near your stores—least direct proxy. | Locations loaded in the platform. Always available. |
Note
Use the highest-ranked method available to you and skip the rest.
Option 1: Customer Data Upload
Upload your own customer records to build a segment profile from your actual buyers. Best for brands with loyalty programs, POS data, or e-commerce transaction history. Ideal to have data split by store where possible.
Go to Append → Customer Lists → Upload List.
Upload your customer file. Include customer addresses or coordinates and store ID (if available). Upload two files: one overall list, and one that you will split by store using a Store ID column (the platform will ask if you wish to split on upload). If you'd like to map your customer data, agree to retain data for mapping (recommended).
Go to Analyze. Select Customers in the Source dropdown, then select your uploaded list. In the Breakdown dropdown, select PersonaLive Groups (or PersonaLive Segments for more targeted channels such as direct mail). Review the top groups for each store you want to activate, or nationally if you are running a national campaign. Note the top 3–5 with significant percentages and indices over 100—you'll use these in Activate.
Tip
For local store marketing, select the split file option on your customer files so you can identify which segments drive performance at each store individually, rather than blending your entire fleet.
Option 2: Credit Card Spend
Spend data identifies which groups are actual paying customers at your brand—not just visitors or nearby residents. Outside of your own customer data, this is the highest-fidelity signal for segment identification. Available for Strategist subscribers and larger brands.
Go to Explore → Credit Card Transactions.
Select your brand from the Category/Brand dropdown. If your brand does not appear, it may not have sufficient transaction volume in the dataset. Choose an analogous brand or move to Option 3.
Select the top groups by Revenue Share. These are the groups actually spending money at your brand. Note the top 3–5 (share and index)—you'll use these in Activate. If you are looking for regional insights for a localized campaign, narrow your geographic scope to the closest region, state, or DMA by clicking the market base toggle located under the Source dropdown.
Click Activate in the table footer, select the top groups (high revenue share and high index), and Confirm & Send to Activate. You can also note the groups and build the audience manually in the next step.
Tip
Revenue Share filters out casual visitors and confirms who your real, paying customers are. It's a more precise signal than foot traffic or residential proximity.
Tip
When selecting top groups, pay close attention to those that make up both a high Revenue Share and have a high Index.
Option 3: Mobile Data
Uses movement data from mobile devices to identify who actually visits your locations. Available for any brand with locations loaded in the platform.
Add mobile data in Append using one of these methods:
- Add Brand Locations: Append → Add Location → Add Brand Stores. Select a brand to quickly add locations from our brand catalog. Many of these locations already have mobile data associated with them.
- Upload Location List: Append → Add Location → Upload File. Upload a CSV of your locations. Mobile data is linked automatically if a Brand column is included in the file and we're able to match it to our existing mobile data.
- Upload Mobile Report: Append → Mobile Reports → New Report → Upload Report. Upload one or more reports from your mobile data provider.
- Create a custom report: Append → Mobile Reports → New Report → Create Report. Draw a polygon to pull mobile data for locations that are not pre-loaded.
Go to Analyze. Select Visitors in the Source dropdown, then select your target locations or mobile reports. In the Breakdown dropdown, select PersonaLive Groups.
Click Activate in the table footer, select the top 3–5 groups (percentage and index), and Confirm & Send to Activate. You will be redirected to Activate to push your groups to your channel.
Note
If you're running a national campaign, select all of your locations. If you're running a geographically constrained campaign, only select the locations in that geography.
Option 4: Radius Rings
Analyzes the residential population within a set distance of your locations.
Add locations in Append using one of these methods:
- Add Brand Locations: Append → Add Location → Add Brand Stores. Select a brand to quickly add locations from our brand catalog.
- Upload Location List: Append → Add Location → Upload File. Upload a CSV of your locations.
Go to Analyze. Select Trade Areas in the Source dropdown, then select your target locations. In the Breakdown dropdown, select PersonaLive Groups.
Click Activate in the table footer, select the top 3–5 groups (percentage and index), and Confirm & Send to Activate. You will be redirected to Activate to push your groups to your channel.
Note
Radius rings reflect who lives near your stores, not who visits or buys. For destination brands or those in mixed-use areas, this can overweight segments that are geographically close but not actual customers.
Build your audience in Activate
The Activate tab is where you translate your target groups into an exportable audience. This step is the same regardless of which channel you plan to activate on.
Select groups or segments
Choose the groups with the highest percent and index scores for your brand. You can select multiple. There are three ways to start:
- Analyze → Activate — Select groups or segments from an Analyze result.
- Explore → Activate — Select groups or segments from an Explore result.
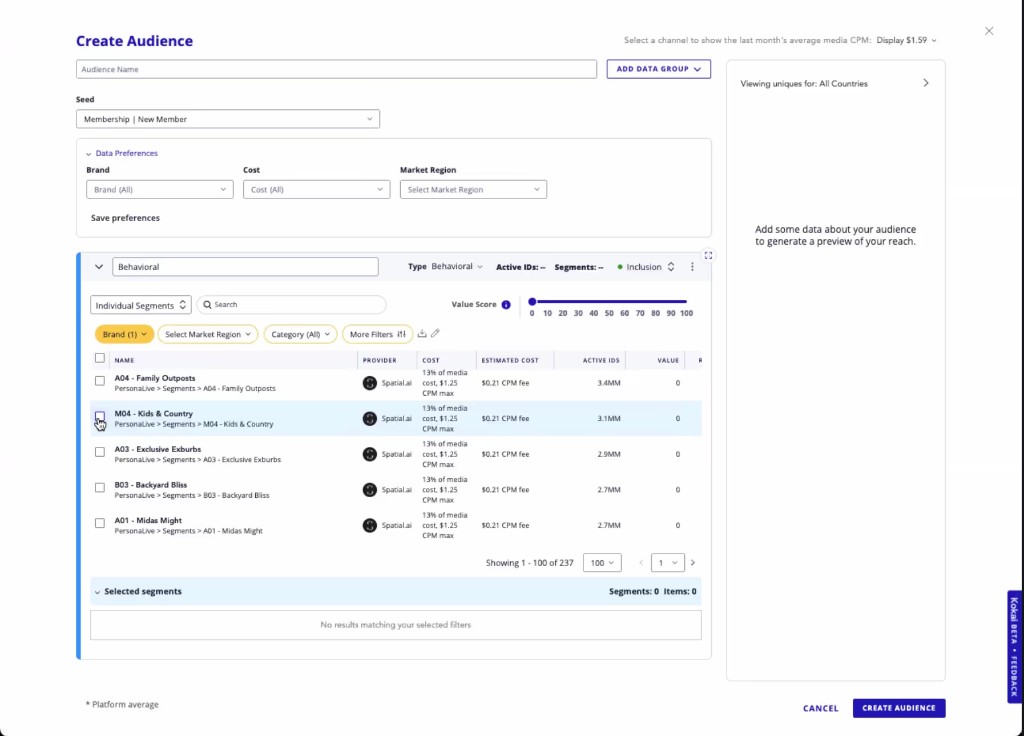
- Activate → Create Audience — Choose a channel first, then select groups or segments manually.
Tip
For most campaigns, 3–5 focused Groups will outperform a broad selection. A smaller, higher-index audience typically delivers better CTR and lower CAC than a large, diluted one.
Tip
For direct mail, be as targeted as possible and build the audience at the segment level.
Choose your export destination
Select the channel you want to activate. When you build an audience manually from Activate → Create Audience, you start with this step before selecting groups.
Apply geographic and demographic filters (optional)
Narrow your audience by geography (DMA, state, zip code, radii) or demographic attributes if your campaign requires it.
For example, if you're opening a new location in Phoenix, filter the audience to the Phoenix DMA before exporting. If your product skews toward a specific age band or income tier, apply those filters here when the channel supports them.
Note
Geographic filters are especially useful when running localized campaigns for new store openings and regional promotions.
Preview and confirm your audience
Review the estimated audience size before exporting. If the audience is too small or too large, adjust your group selection or your demographic and geographic filters.
Click Create Audience to create the audience. Each channel takes a different amount of time to process. You will receive an email when the audience is ready. Meta audiences typically transfer almost immediately.
Export to your channels
Each section below covers one channel. Go to the channel or channels you plan to activate on. CTV via Adduro.io is also available as a destination.
Meta (Facebook & Instagram)
PersonaLive pushes your audience directly to your Meta Ads Manager account using your account ID. From there you can run campaigns across Facebook and Instagram, or use the audience as the seed for a lookalike.
Click Create Audience, and select Meta as your destination.
Enter your Ads Manager account ID—not your Business ID. The ID should be a 9–15 digit number found in Meta Ads Manager under Business Settings → Ad Accounts. Use the connection check to confirm the account is linked correctly. If you have not run Facebook campaigns before, you may need to run a few first so Meta will allow third-party audiences.
Review the selected groups and click Create Audience. The audience transfers to your Business account and appears on the Audiences tab.
In Meta Ads Manager, open Audiences, find the shared audience, and click Accept Audiences. If you do not accept it, you will not be able to find or use it. Meta will show the audience status as Populating and then Ready. You can begin building your campaign once the status is Ready.
Tip
Once your audience is live in Meta, create a new campaign and add the audience as Advantage+ audience suggestions at the ad set level. This nudges the campaign toward the right people while allowing it to find similar consumers. Apply geographic targeting in Meta's location controls—for example a radius around a store—so the national audience is constrained to the local market.
Note
Requires a Meta Business Account with an active Ad Account. For Meta, push the national audience to Ads Manager and narrow targeting at the ad set level.
Programmatic (The Trade Desk & Google DV360)
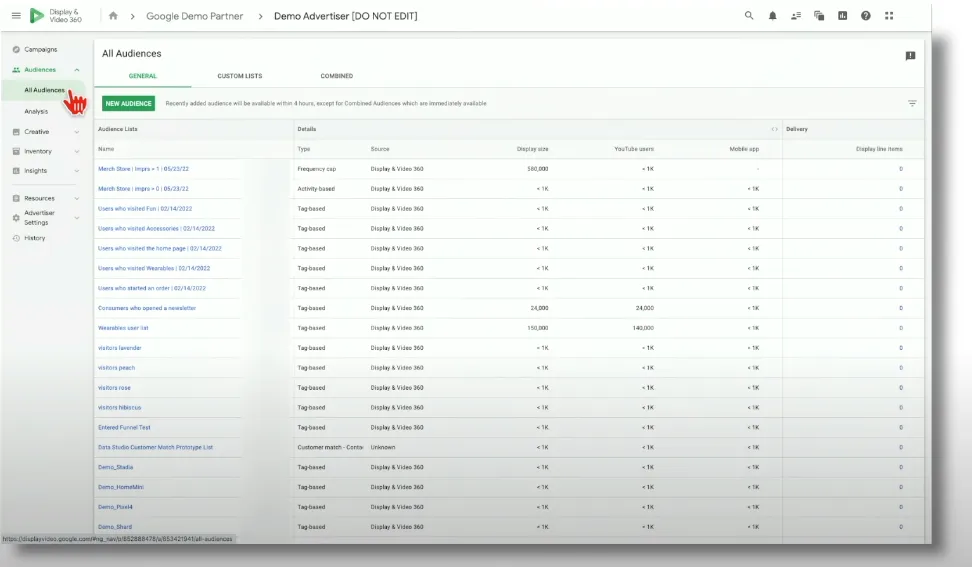
For programmatic channels, your PersonaLive audience is available in the platform's data marketplace. You do not need to push the audience from Activate. Search for PersonaLive in The Trade Desk or Google DV360 and set up your campaign there.
Note
Simpli.fi uses a programmatic seat instead of the marketplace: the audience is sent to your account rather than searched in a data marketplace.
Hashed customer lists (X, TikTok, Snapchat, LinkedIn, Pinterest, Amazon)
For social platforms besides Meta, export a file of hashed customer emails and upload it to the platform as a customer list.
Click Create Audience, and select a Formatted List option. PersonaLive exports a file of SHA-256 hashed emails. The hashes are not personally identifiable; the platform uses them to match against its own user base without exposing contact data.
After the audience finishes processing in Activate, download the file. Large audiences can take time; avoid clicking download repeatedly, or you may trigger multiple downloads.
Open the platform's Ads Manager, go to Audiences, and create a new audience from a list. Upload the file. When prompted for the row or type format, select the option indicating the data is an email using a SHA-256 hash.
Wait for the platform to process and match the list. You can begin using the audience in campaigns once it shows as Active.
Note
The file contains email values that look encrypted or unreadable. That is expected: they are SHA-256 hashed emails, not an error.
PersonaLive can export a file of email addresses for use in your email platform. Click Activate → Create Audience, choose the email list destination, apply any geographic filters your campaign needs, then download the file and upload it to your email vendor.
Direct mail
PersonaLive can export a mailing list of physical addresses tied to your target segments for use with your direct mail vendor. This is one of the more straightforward exports—no account ID or platform login required.
Click Create Audience, and select Direct Mail as your destination.
Apply any geographic filters to scope the list to your target markets—for example a specific DMA, state, or radius around a new store location.
Download the exported mailing list file. The file contains mailing addresses matched to your selected segments. Provide this file directly to your direct mail vendor for activation.
Tip
Direct mail is especially effective for new store opening campaigns and customers with LTV above $200. Export a list filtered to a 5–10 mile radius around the new location to reach the highest-density pocket of your target segments nearby.
Tip
Tighter radius usually means better response rates, so stay as close to your stores as possible.
Note
Physical addresses are available for purchase at $0.02 per address.
Zip code / radii targeting (Google Ads)
PersonaLive exports a list of zip codes ranked by concentration of your target segments. You upload this list directly into Google Ads as a location targeting list.
Click Create Audience, and select Zip Codes or Radii as your export type.
Apply any geographic filters to focus the zip codes on your target markets. Filter to the DMAs or states where you're actively running campaigns.
Download the exported list.
In Google Ads, upload the zip code list to target specific locations.
Tip
Zip code targeting is particularly effective for campaigns where you want to bias ad delivery toward areas with the highest concentration of your target segments without needing to match individual users.
Note
Zip code exports are also helpful for allocating a higher budget to zip codes with high concentrations of your best customers.
Personalizing creative by segment
Exporting the right audience is only half of activation. Campaigns perform best when creative and copy are customized for each audience—not when one generic ad is shown to every PersonaLive group you export.
Treat personalization as a required step: different groups have different lifestyles, interests, and motivations. A campaign targeting Wealthy Suburban Families should look and feel different from one targeting Young Professionals, even if both are in your top segments. Matching imagery, tone, and messaging to each audience is where you typically see the strongest lift in engagement and efficiency.
Use PersonaLive segment metadata and the Campaign Brief module to brief your creative team:
- Go to Segments, open the group or segment you are activating, and open Campaign Brief.
- Review lifestyle imagery, interests, brands, and campaign inspiration for that audience.
- Share the brief with whoever is building ads, email, or direct mail so each audience gets its own creative treatment.
See Segments for how to read group and segment profiles.
Tip
If you activate multiple groups or segments in one campaign, plan distinct creative variants per audience whenever budget allows. Reusing the same assets across very different segments usually underperforms.
Advanced tips
Running localized campaigns
If you're running campaigns tied to specific store locations or markets, build a separate campaign per store or market rather than using one national audience. This lets you control spend by market, customize creative for local context, and better measure performance.
The Nudge Method for Meta campaigns
Meta's algorithm performs best when it receives early engagement signals to learn from. The Nudge Method is a 5-step framework for structuring Meta campaigns so the algorithm reaches your highest-intent audience faster, resulting in better CTR and lower CAC over time.
Read The Nudge Method and find additional resources at spatial.ai/resources.